Blog

Unblocked particular IP from WHM/cPanel

Log in to the main WHM Panel

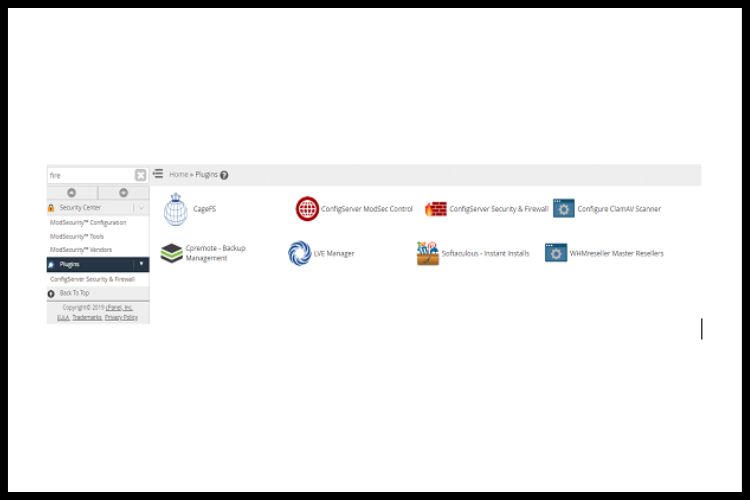
Step 1: Search for Plugin section.

Step 2: Go to ConfigServer Security and Firewall.

Step 2

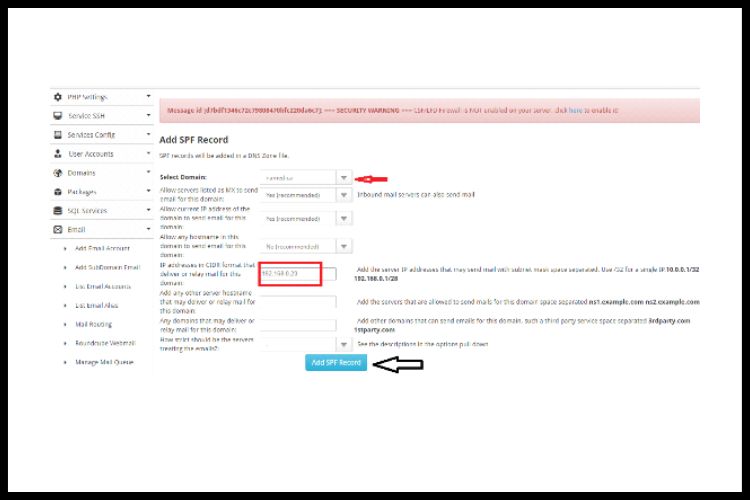
Step 3: Search for the IP which you want to get unblocked from WHM Panel.

Step 3

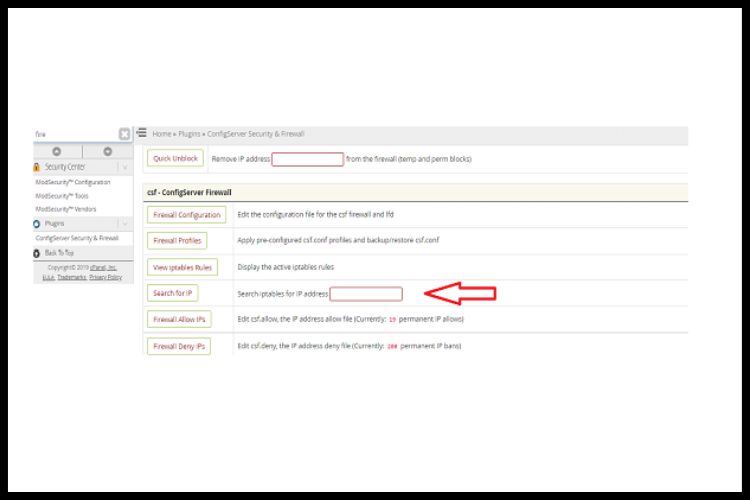
Step 4: If given IP will be blocked then you’ll find that IP here after clicking on Search for IP button.

To unblock that IP you’ll get the Unblock button below, just simply click on that button and that IP will be unblocked.

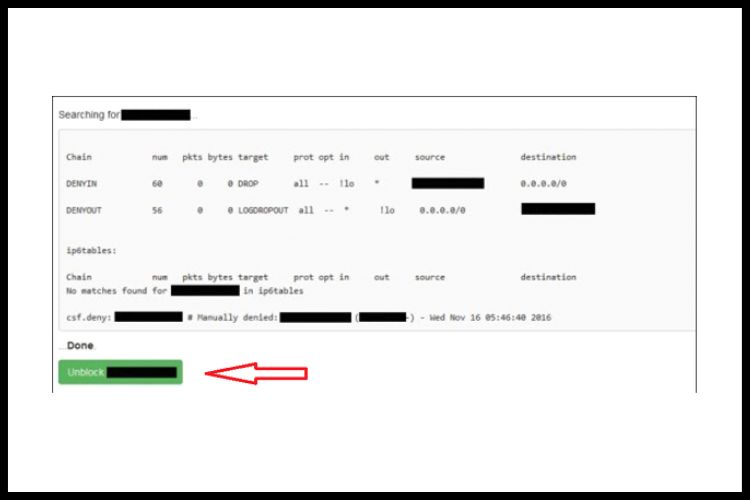
Now user can open the panel from that IP.

The reason why IP got blocked: User might attempt a multiple failed login attempt.

Conclusion

Still confused how to unblocked particular IP from WHM/Cpanel. Contact Ideastack now.

Frequently Asked Questions

Q1. What is WHM cPanel?

A web application called WebHost Manager (WHM) from cPanel gives you administrative control over your dedicated server or Virtual Private Server (VPS). To create individual accounts, add domains, manage hosting services, and carry out simple maintenance, you utilise WHM with cPanel.

Q2. What does WHM mean hosting?

WHM (WebHost Manager) gives you administrative access to your dedicated server or virtual private server. It enables a hosting company to control a client’s account. WHM can also be used as a reseller control panel.

Using cPanel to create a website

1. Easy way to Install:

cPanel can be done with no trouble installed in a few ways. Simply, install the Linux OS and run the characters for installation. You will observe that a big piece of your server preparation is completed.

2. Extremely adaptable:

cPanel is flexible widely with gigantic numbers of open source applications.

3. Communicative interface:

cPanel provide a variety of virtual interfaces to a range of customers that incorporate clients, managers, and email customers.

4. Effortlessly adaptable:

cPanel furnishes you with easy expediency comprise during which you can swap your site starting with one facilitating association and then onto the next.

5. No linked information required:

cPanel furnishes you with easy expediency comprise during which you can swap your site starting with one facilitating association and then onto the next.

Using cPanel to create a website

Additional details about cPanel

Once cPanel is install it will not be debarred from the server without a total server restore. cPanel does not tender an uninstaller also, cPanel is legally responsible for a licensing fee which may turn out to be around a year. Before installing cPanel on our droplet, we need to take two added steps first we have to make sure Perl is install on the server.

After downloading Perl we need to make certain that one more initial step. cPanel is very picky about ensuring that the server that it is installed on has a completely Qualified Domain Name. To that result, we need to give it a suitable hostname. Or else, if you want to carry on with the cPanel installation but still lack the hostname, you can contribute a provisional one.

Once cPanel is installed, will be able to change the hostname to the accurate one on one of the first setup pages. Then exit out of the screen. The script, which can take one to two hours to complete will carry on running while in the backdrop even if you shut out of the server.

Conclusion

Still confused about using cPanel to create a website? Contact Ideastack now.

Frequently Asked Questions

Q1. What is the difference between cPanel and WordPress?

WordPress is one of the content management systems on which you can create your website, whereas cPanel is a server management technology.

Q2. Do all websites use cPanel?

Due to its popularity, not every host employs cPanel to help clients in managing their websites.

Q3. Why do people use cPanel?

Because of its ease of use and simple interface, cPanel is a popular choice among webmasters. Additionally, cPanel makes it simpler to handle online files, run websites, and do other duties.

INSTALL AN SSL IN WHM PANEL

There are three basic steps to install SSL:

1. Generate a CSR
2. Purchase SSL
3. Install SSL

1. Generate a CSR

1. First login into the WHM panel.

2. Go to the SSL/TLS option in this select Generate an SSL certificate and signing the request.

Step 2

3. After that fill in the all credential as required like domain name, city, company, email id, etc.

4. After filling in all the detail save the credential and CSR has been generated, shown below.

Step 4

2. Purchase SSL

After generating a CSR take an SSL of Comodo, or from any provider.

3. Install SSL

1. Go to the SSL/TLS option in this and select Install an SSL Certificate on a Domain.

Step 1.1

2. In this fill the detail domain name and SSL certificate, private key, and Certificate authority bundle.

3. After that install the SSL and write a code to redirect http to https.

Finally, the website is running on https.

Conclusion

Still confused about how to install an SSL in WHM panel? Contact Ideastack now.

Frequently Asked Questions

Q1. Where do I install SSL certificate?

Click SSL/TLS Certificates under the Websites and Domains heading for the domain name you want to use. Add SSL Certificate by clicking. Enter a Certificate name, fill out the details in the Settings section, and then click Request.

Q2. Why is my SSL certificate not showing up?

The most frequent reason for a “certificate not trusted” problem is because the certificate installation on the server (or servers) hosting the site was not correctly finished. To check for this problem, use SSL Certificate tester. In the tester, an incomplete installation results in one certificate file and a broken red chain.

Q3. Where is SSL in cPanel?

Open the cPanel control panel and log in. Locate the SSL/TLS Manager and click it. Select Generate, View, Upload, or Delete SSL Certificates from the menu. Click the Browse button to locate your Primary Certificate under the Upload a New Certificate section (yourdomain).

What is SPF Record ? & How to set SPF Record of your domain in to CWP panel ?

What is SPF Record?

An SPF record is a type of Domain Name Service (DNS) record that identifies which mail servers are permitted to send an email on behalf of your domain.

SPF records are typically defined using the TXT record type. There is also an SPF record type, however, it is deprecated and thus you should always have at least the TXT record definition present, even if you use the SPF type.

What is the purpose of an SPF record?

The purpose of an SPF record is to prevent spammers from sending messages forged from addresses at your domain. Recipients can refer to the SPF record to determine whether a message purporting to be from their domain comes from an authorized mail server.

If your domain does not have an SPF record, some recipient domains may reject messages from your users because they cannot validate that the messages come from an authorized mail server.

If you’ve already set the SPF record for your domain, it means that you have set Google’s servers in the SPF records.

What is SPF record example?

SPF records are define as a single string of text. Here is an example record:

v=spf1 a mx ip4:192.168.0.20 include:_spf.google.com ~all

The SPF record always starts with the v= element. This indicates the SPF version that is use. Right now the version should always be spf1 as this is the most common version of SPF that is understood by mail exchanges.

How to set SPF records of your domain into the CWP panel?

Just follow the below few steps to set the SPF Record of your domain under the CWP panel:

Step 1:-

Login to your CWP panel by using port: 2030
url: https://server ip:2030

Step 1

Step 2.1:-

Go to the Email section under your Login CWP panel. You will find their SPF manager, just click on it.

Step 2.2:-

Once you will click on SPF manager it will provide the below screen for SPF setup.

Step 2.2

Step 3:-

Just select your domain in the drop down, and mention the server IP. After filing detail just click on Add SPF Record. Using the above step we can set Your domain SPF Record, under the CWP panel.

Step 4:-

To verify the SPF Record. Just go to DNS Function >> List DNS zone >> click on edit your domain DNS zone. You will see add the bottom of your DNS zone file your domain SPF Record has been added in txt format.

Conclusion

Still confused about what is SPF Record? & how to set SPF Record of your domain in to CWP panel? Contact Ideastack now.

Frequently Asked Questions

Q1. Why do I need an SPF record?

SPF is a standard email authentication method. SPF helps shield your domain from spoofing and keeps receiving servers from flagging your outgoing communications as spam. The mail servers that are authorized to send an email for your domain are listed in SPF.

Q2. How do I fix my SPF record?

Examine the servers and services in your SPF record. Take the actions in Verify if you already have an SPF record. Make sure your SPF record includes all servers and senders that currently send email for your domain. Any new sender information needs to be updated in your SPF record.

Q3. How long can an SPF record be?

The Domain Name System (DNS) has a 255 character string limit for Sender Policy Framework (SPF) records. If your SPF record contains a string that is longer than 255 characters, the SPF authentication check will fail.

How to generate SSH key and add to the ssh agent?

As we know all time we access the ssh of any system by using the username and password so we can avoid this by adding the ssh to the agent system. If you don’t want to re-enter the password of ssh then add your key to the ssh-agent.

Step 1:-

Open ssh Gt bash.

Step 2:-

Generating new ssh key.

ssh-keygen -t rsa -b 4096 -C “[email protected]” it will create the ssh key.

Step 3:-

When you’re prompted to “Enter a file in which to save the key,” press Enter. This accepts the default file location.

Enter a file in which to save the key (/Users/you/.ssh/id_rsa): [Press enter]

Step 4:-

At the prompt, type a secure password.

Enter a file in which to save the key (/Users/you/.ssh/id_rsa): [Press enter]

Enter same passphrase again: [Type passphrase again]

Adding your SSH key to ssh-agent

Before adding a new SSH key to the ssh-agent to manage your keys, you should have checked for existing SSH keys and generated a new SSH key.

A)

Ensure the ssh-agent is running. The ssh-agent should be running. If you are using another terminal prompt you can use the “Auto-launching the ssh-agent” instructions in “Working with SSH key passphrases”, or start it manually.

# start the ssh-agent in the background
eval $(ssh-agent -s)
Agent pid 59566

B)

Add your SSH key to the ssh-agent. If you used an existing SSH key rather than generating a new SSH key, you’ll need to replace id_rsa in the command with the name of your existing private key file.

$ ssh-add ~/.ssh/id_rsa

Conclusion

Still confused about how to generate an SSH key and add it to the ssh-agent? Contact Ideastack now.

Frequently Asked Questions

Q1. Where is the ssh-agent?

SSH keys are stored in the. ssh directory inside the user’s home directory by default.

Q2. What is the SSH key format?

The public key generated by ssh-keygen is saved in the SSH format, which is not a cryptographic standard. Its structure is ALGORITHM KEY COMMENT, where the Base64 encoding of the KEY component of the format.

Q3. What is the SSH host key?

A host key is a cryptographic key that the SSH protocol uses to authenticate machines. Typically using the RSA, DSA, or ECDSA algorithms, host keys are key pairs. Private keys are kept on SSH servers, while public host keys are kept on or transmitted to SSH clients.