Blog

How to install RAID 10 in centos7?

If you’re looking to enhance the performance and redundancy of your CentOS 7 server, configuring RAID 10 (also known as RAID 1+0) is an excellent choice. RAID 10 offers both data mirroring and striping, combining the benefits of RAID 1 and RAID 0. In this guide, we’ll walk you through the steps to install RAID 10 on CentOS 7.

Prerequisites

Whenever you start, make sure that you have the following:

  1. A CentOS 7 server or system with a minimum of 4 disks.
  2. An efficient understanding of the Linux command line.

1. Boot into CentOS 7 Installation Media

Start by booting your CentOS 7 installation media, such as a bootable USB drive or DVD Follow the on-screen instructions to start the installation process.

2. Configure Language and Keyboard

Select your preferred language and keyboard layout when prompted during the installation process.

3. Installation Source

Choose the installation source that best suits your needs. Typically, you’ll use the default settings for this step.

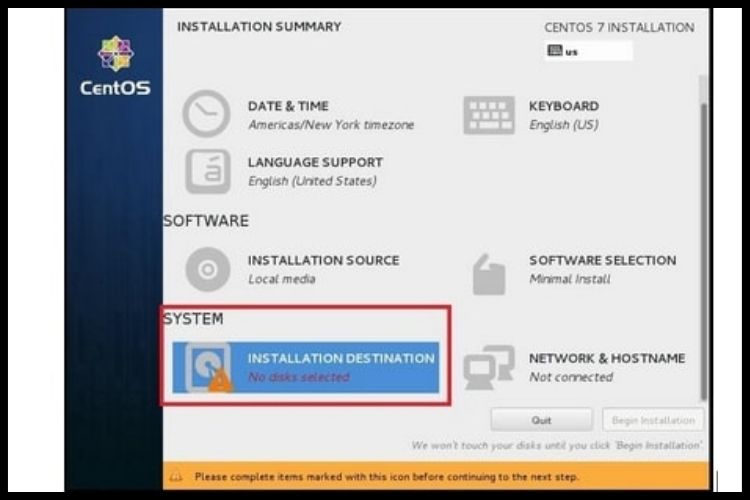
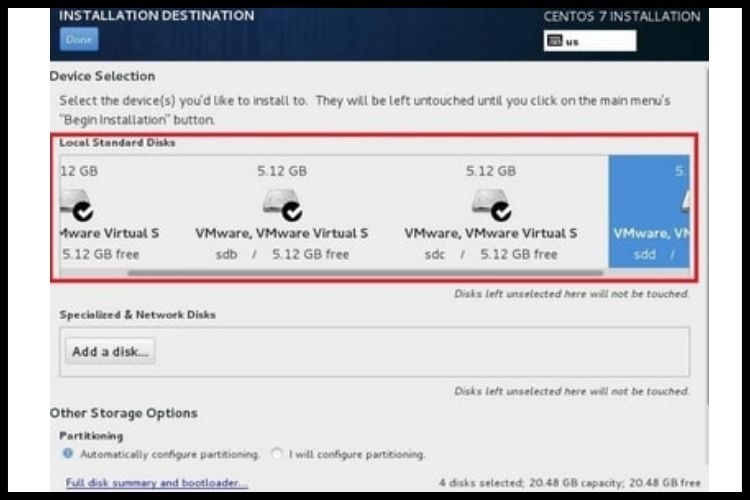
4. Installation Destination

Once you’ve configured the language and installation source, proceed to the “Installation Destination” section. Here, you will configure the RAID 10 setup.

1. Select "Installation Destination."

Installation destination of RAID 10

2. Choose the disks you want to use for your RAID 10 setup. Four drives are needed at minimum for RAID 10.

Four drives are needed at minimum for RAID 10.

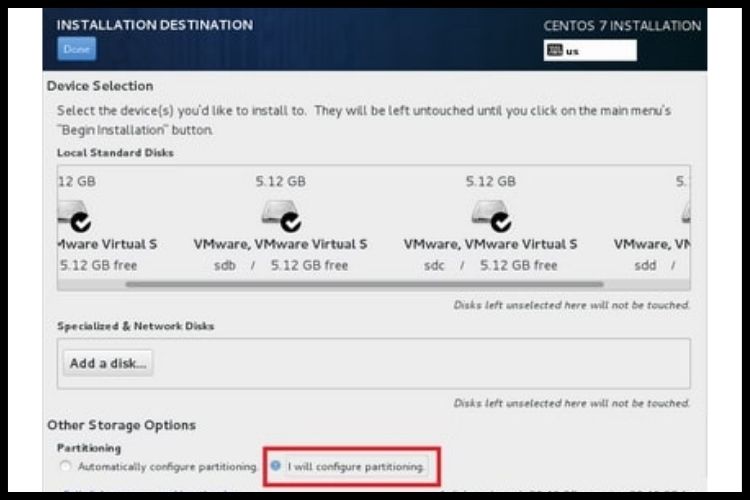
3. If you are re-installing the operating system and already have a RAID configuration in place, go to "How to reinstall RAID?" and select "I will configure partitioning." Click "here" to create the partitions.

Re-installing the operating system of RAID10

4. This action will automatically create the partitions.

Action that automatically create the partitions.

5. For each disk, set the "Device Type" to "RAID" and select "RAID Level" as "RAID10."

The Device Type to Select RAID Level
Set the Device type to select RAID level as RAID10

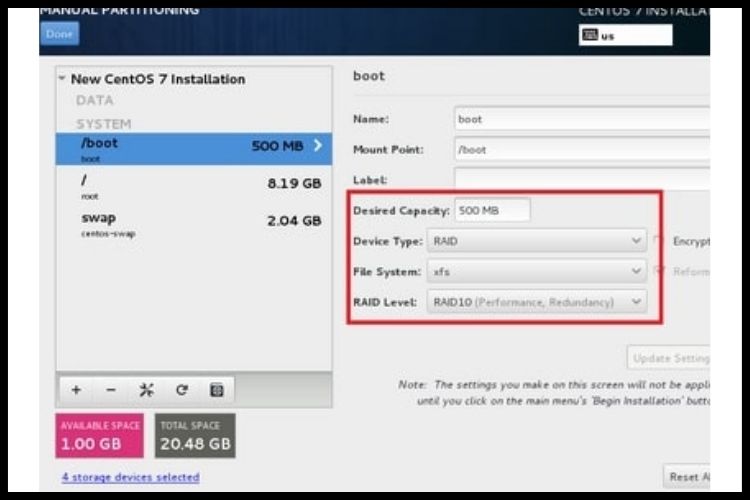
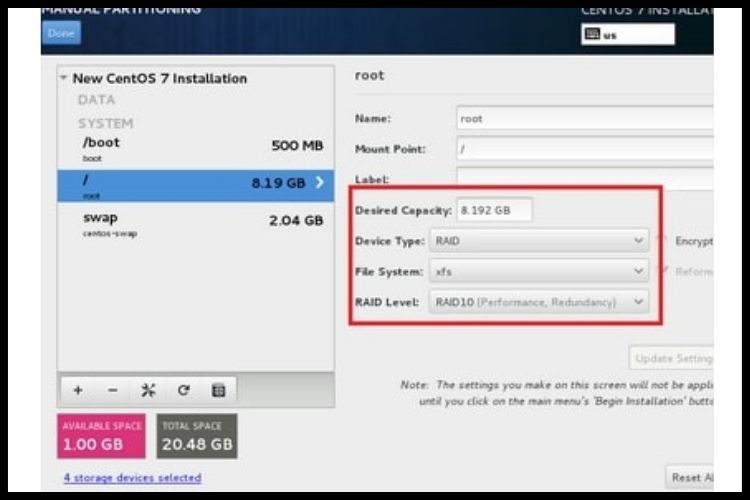
6. For the file system, choose "xfs."

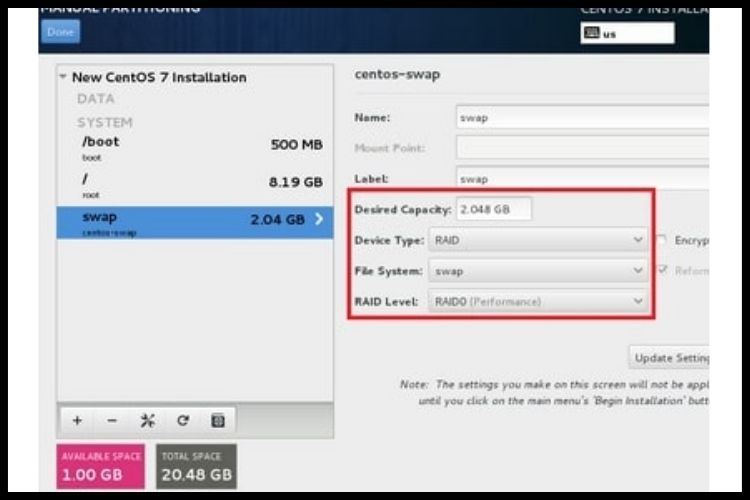
7. Can select swap to DEVICE Type: RAID and RAID Level: RAID0 File System: swap

RAID level file system choose "xfs"

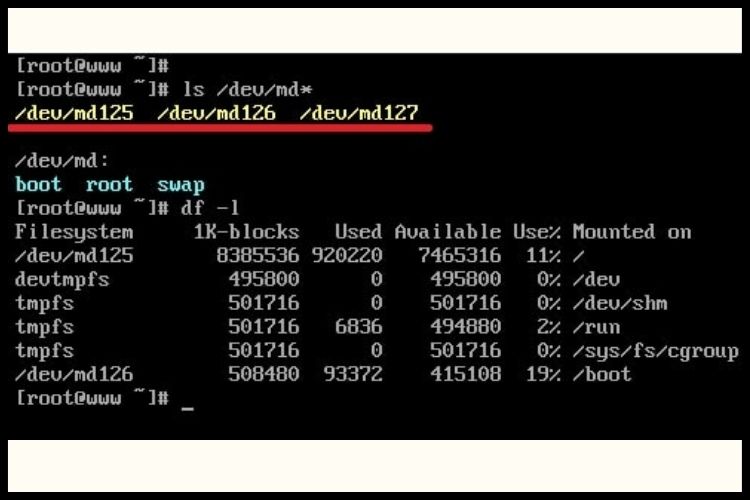
8. We can verify RAID configuration using df -l command or mdadm

Verify RAID configuration using df -l command or mdadm

You can also configure a swap partition within the RAID array for added performance.

  • Set “Device Type” to “RAID.”
  • Choose “RAID Level” as “RAID0.”
  • For the file system, select “swap.”

5. Begin Installation

Once you’ve configured the RAID 10 setup and any additional partitions, click “Done” to save your settings. Then click “Begin Installation” to begin the installation.

6. Complete the Installation

Follow the on-screen prompts to complete the CentOS 7 installation. Set the root password, create a user account, and configure other system settings as needed.

7. Verify RAID Configuration

After the installation is complete and the system reboots, you can verify the RAID configuration using the following command:

df -h

This will display the available disk space and show that your RAID 10 array is active.

View more click to Ideastack

Conclusion

Configuring RAID 10 in CentOS 7 is a great way to improve both performance and data redundancy on your server. By following these steps, you can set up RAID 10 with ease and enjoy the benefits it provides.

Frequently Asked Questions

Q1. What is the minimum number of disks required for RAID 10 in CentOS 7?

You need a minimum of 4 disks to configure RAID 10 in CentOS 7. This RAID level combines data mirroring and striping for improved performance and redundancy.

Q2. Can I configure a swap partition within the RAID 10 array?

Yes, you can configure a swap partition within the RAID 10 array for added performance. Set the “Device Type” to “RAID” and choose “RAID Level” as “RAID0” when creating the swap partition.

Q3. How can I verify that the RAID configuration is active?

You can verify the RAID configuration by running the command df -h in the terminal. This command will display the available disk space and confirm that your RAID 10 array is active and functioning correctly.

How to install Website Panel

Website Panel is a popular Windows hosting control panel that makes it easier for users to manage their hosted websites, databases, and other resources. For anyone looking to establish a hosting environment on a Windows server, Website Panel can be a handy tool.

This blog post will guide you through the installation process, ensuring that you can have your website panel up and running in no time. 

The Quick Process of Installing the Setup for Website Panel

Follow the steps outlined below:

1. Initialization

Double-click the Website Panel Installer icon on your server’s desktop. If you are not able to run the installer, you may need to right-click on the icon and then run as an administrator..

the Website Panel Installer icon on your server’s desktop

2. Component Overview

When the Website Panel Installer opens, click “View Available Components.”

the Website Panel Component Overview

3. Choosing the Server Setup

Click the “Install” link for “Website Panel Standalone Server Setup.”

Website Panel Standalone Server Setup.

4. Beginning the Setup

On the Setup Wizard, click “Next.”

The Wizard setup Beginning

5. License Agreement

You’ll then need to read and agree to the terms of the license agreement.

The Wizard setup terms of the license agreement.

6. System Check

The wizard will perform a system configuration check. The process may take a few minutes. Once completed and all statuses show “success,” click “Next.”

The wizard System configuration process

7. IP Configuration

In the next step, you’ll need to select an IP address for the Website Panel portal. If you are only working with the 2 standard IP addresses that came included with your server purchase (e.g., you did not purchase additional IP blocks), go ahead and select your primary (machine) IP address. Note that the port number is 9001.

The IP address for the Website Panel portal.

8. Database Settings

Next will be database settings. Do not change the SQL Server or authentication fields. They should remain as “localhost\sqlexpress” and “Windows Authentication.” You can, however, change the database name if you wish, but you can click “Next” without making any changes.

The SQL Server Database settings

9. Password Setup

Provide a strong password; this will be for the “server admin” account for the Website Panel.

Password Setup of the website panel

10. Installation

The installation process may take several minutes; once completed, click “Next.”

The installation process of website panel

11. Completion

Congratulations! The website panel is now installed. ”On the last step of the wizard, click Finish.”

The website panel is now installed.

12. Access

Your Website Panel portal will now be accessible from any internet-connected web browser by visiting http://[the IP address used in step 7]:9001.

Conclusion

Setting up the website panel is a straightforward process designed to get your hosting control panel up and running with minimal hassle. Once installed, you can effectively manage your hosted resources and ensure that everything runs smoothly.

For more information, visit our website, Ideastack

Frequently Asked Questions

Q1. What is the Website Panel used for?

Website Panel is a Windows-based hosting control panel. It helps users manage multiple hosting tasks, like setting up websites, databases, and other services, seamlessly.

Q2. If I encounter an error during the system configuration check, what should I do?

Ensure all system requirements are met and that you’re running the installation as an administrator. If the problem persists, visit the Website Panel community forums or contact their support for assistance.

Q3. Can I change the port number from 9001 to something else?

While the default port is 9001, advanced users can modify this after the installation. However, ensure that the new port isn’t being used by another service to avoid conflicts.

How to install TOMCAT on server by using panel CWP

Apache Tomcat is pivotal software in the world of Java-based web applications. Apache Tomcat is an open-source software that implements Java Servlet, Java Server Pages, Java Expression Language, and Java WebSocket technologies These specifications are fostered under the stewardship of the Java Community Process.

It’s worth noting that Apache Tomcat, Tomcat, Apache, the Apache feather, and the Apache Tomcat project logo are registered trademarks of the Apache Software Foundation.

Latest Release Notes: Apache Tomcat 8.0.14

The Apache Tomcat Project is elated to unveil the release of version 8.0.x of Apache Tomcat. Intended as a replacement for 8.0.x, it incorporates new features sourced from Tomcat 8.0.x. The foundational requirements in terms of Java version and implemented specification versions remain the same. Key changes from 8.0×2 include

Benefits

  1. Various enhancements in HTTP/2
  2. Resolutions for issues associated with file sending that might lead to subsequent requests facing Illegal State Exceptions
  3. Early access updates for Servlet 4.0.

Steps to Install Tomcat on the Server Using CWP Panel

Step 1

Navigate to your CWP panel by typing IP:2030 in your browser.

Login into your CWP panel

Step 2

After a successful login, navigate to Apache Settings > Tomcat Manager. Click on Tomcat Manager for further installation options.

login into your CWP panel, GOTO Apache Setting

Step 3

You’ll be greeted with an installation screen. Simply click on “Install Tomcat”. This process may take anywhere between 15 and 20 minutes.

To Install Tomcat on Server

Step 4

Upon successful installation, a success message will be displayed indicating “Tomcat Installed”.

Installation done of TOMCAT on Server

Step 5

To verify, Tomcat operates on port 8080. Type the following in your browser: IP:8080 (for instance, 192.168.0.30:8080).

Verify your url under your Browser

Step 6

If the aforementioned URL displays the correct screen, rejoice! Tomcat has been successfully installed on your server. You are now ready to host your website using Tomcat.

You can host your website using Tomcat installed on your server

For management purposes, such as starting, restarting, or halting the Tomcat service, navigate to Apache Setting >> Tomcat Manager and choose the desired option.

For further information or assistance, feel free to contact us.

To get to know more click on Ideastack

Conclusion

Installing Tomcat using the CWP panel streamlines the process, making it user-friendly and efficient. Ensuring your server is equipped with this robust software guarantees a smooth sailing experience for hosting Java-based web applications.

Frequently Asked Questions

Q1. What is Apache Tomcat primarily used for?

Apache Tomcat is predominantly utilized to host Java-based web applications, serving as a servlet container.

Q2. Are there any costs associated with using Apache Tomcat?

No, Apache Tomcat is open-source software and is free to use, modify, and distribute.

Q3. How can I ensure the security of my Tomcat installation?

Regularly updating Tomcat to the latest version, following best security practices, and configuring firewalls and permissions appropriately will help in bolstering security.

Email troubleshoot in WHM

In the era of instant messaging and social media, email still holds its ground as the primary mode of communication for businesses and individuals. But, like any technology, it’s not immune to issues. This is especially true when you’re managing your servers. Web Host Manager (WHM) is a popular tool that gives you a platform to manage your web hosting server. In this blog post, we’ll guide you through troubleshooting email issues within WHM.

Starting with the Basics

Before we delve into the core of troubleshooting, let’s understand the essence of the tool at our disposal. WHM offers an array of features, one of which is the “Mail Troubleshooter,” designed specifically for diagnosing email problems.

To access the Mail Troubleshooter:

1. Log into WHM write “Mail Troubleshooter” in the search box and press enter.

Mail Troubleshooter in the search box

2. Click on Mail Troubleshooter.

3. Write your email ID in the blank text box and click on the submit button.

Email ID in the blank text box

4. The process of troubleshooting will start. Wait for error messages. If you do not find anything, then there are no problems from the server side.

The process of troubleshooting

By following these steps, you’re effectively checking the mail routing for any specific email address, which can provide insights into any server-level issues causing email failures.

Possible Email Issues and Their Causes

There could be various reasons for email failure:

1. Server Configuration

Sometimes, the server might not be correctly configured to handle emails.

2. DNS Issues

Incorrect DNS settings might mean emails don’t know where to go.

3. Full Mailbox

A recipient’s mailbox could be full, leading to delivery failures.

4. Blacklisting

The server’s IP could be blacklisted, leading to emails being rejected.

If WHM’s Mail Troubleshooter doesn’t identify an issue, it might be worth investigating these potential problems individually.

If you need any help then you can contact us are available 24/7.

For more Click to Ideastack

Conclusion

Email is a critical component of any online operation, and ensuring its smooth operation is paramount. WHM provides tools like the Mail Troubleshooter to assist administrators in identifying and resolving email issues. By understanding how to utilize these tools, you can ensure seamless email communication and avert potential crises.

Frequently Asked Questions

Q1. Can WHM's Mail Troubleshooter resolve all email issues?

No, the Mail Troubleshooter in WHM can help identify server-side issues. Some problems might be due to external factors like DNS settings, recipient’s mailbox conditions, or blacklisting.

Q2. How often should I check for email issues in WHM?

Regular monitoring is always a good practice. If you’re not facing any noticeable issues, a monthly check might suffice. However, if you’re running a large operation with frequent email exchanges, weekly checks might be more appropriate.

Q3. What if the mail troubleshooter doesn't find any problems, but I'm still facing email issues?

The issue may be outside the server. Check the DNS settings, consult with your hosting provider, or consider external email delivery services for more reliable performance.

How to install WordPress in CWP

CentOS Web Panel (CWP) is an intuitive platform that provides a structured environment for users aiming to seamlessly host and manage websites. While there are several content management systems out there, WordPress stands as the most popular choice due to its user-friendly interface and rich feature set. In this guide, we’ll walk you through the steps to install WordPress on CWP efficiently and effectively.

Getting Started: The installation process is straightforward and follows a structured pattern. Here’s a step-by-step rundown

1. Open the CWP panel and create a new account.

To start, you’ll need to have CWP installed on your server. Access the CWP panel by navigating to your server’s IP address followed by the port number, usually 2030 (for example, http://your_server_ip:2030). Log in using your root credentials.

Once inside the CWP dashboard

  1. Navigate to the ‘User Accounts’ section.
  2. Click on ‘New Account’.
  3. Fill in the necessary details, such as domain name, username, and password.
  4. Click ‘Create’. This action sets up a new user account with its public_html directory where you’ll install WordPress.
Open the CWP panel and create a new account.

2. Create a MySQL database.

Before installing WordPress, you need a database

  1. In the CWP dashboard, navigate to ‘SQL Services’.
  2. Click on ‘MySQL Manager’.
  3. Select ‘Create Database & User’.
  4. Fill in the desired database name, username, and password. Note these details as they’ll be essential for the WordPress setup.
  5. Click ‘Create’. Your new database and user are now ready.

3. Take SSH access to servers and run the following commands.

Now, it’s time to download and set up WordPress files:

3.1.Navigate to the user's directory:

CD /home/USERNAME/public_html

3.2. Download the latest WordPress archive:

wget http://wordpress.org/latest.tar.gz

3.3. Extract the archive:

tar xvzf latest.tar.gz

3.4. Move the WordPress files to the root of the public_html directory:

mv WordPress/*

3.5. Remove the now-empty WordPress directory

rm -rf WordPress

3.6. Assign appropriate permissions:

chown -R USERNAME:USERNAME *

Create a MySQL database.

4. WordPress Configuration:

Once the files are in place, configuring WordPress is the next step:

4.1. In a browser, navigate to your domain name.

Once the files are in place, configuring WordPress is the next step

4.2. Provide the database details:

Enter the database name, username, and password you created in step 2.

4.3. Fill in the site-specific details

Input the site title, admin username, password, and email.

4.4. Once all is set, click on the 'Install WordPress' button.

After a successful installation, you can log in to the WordPress Admin section using the credentials you provided.

Click To Know More Ideastack

Conclusion

Installing WordPress on CentOS Web Panel (CWP) is a straightforward process, allowing users to benefit from both the robustness of CWP and the versatility of WordPress. This union facilitates easy management, scalability, and an enriched user experience for website developers and visitors alike. By following the outlined steps, you can have your WordPress site up and running in no time.

Frequently Asked Questions

1. What should I do if the WordPress installation wizard doesn't appear?

Ensure that you’ve correctly moved all the WordPress files to the public_html directory. Also, check your domain’s DNS settings to make sure it’s pointing to your CWP server’s IP address.

2. Can I use this process to set up multiple
WordPress installations on CWP?

Yes, you can. For each new WordPress site, create a new user account in CWP. This will give you a separate public_html directory for each website. Then, simply repeat the installation process for each domain.

3. How do I ensure my WordPress installation on CWP remains secure?

Regularly update WordPress core files, plugins, and themes. Use strong, unique passwords and consider integrating security plugins like Wordfence or Sucuri. Always take backups, and monitor user activities. Lastly, ensure your CWP and server software are up-to-date.