Blog

How to create VPS on KVM Virtualizor
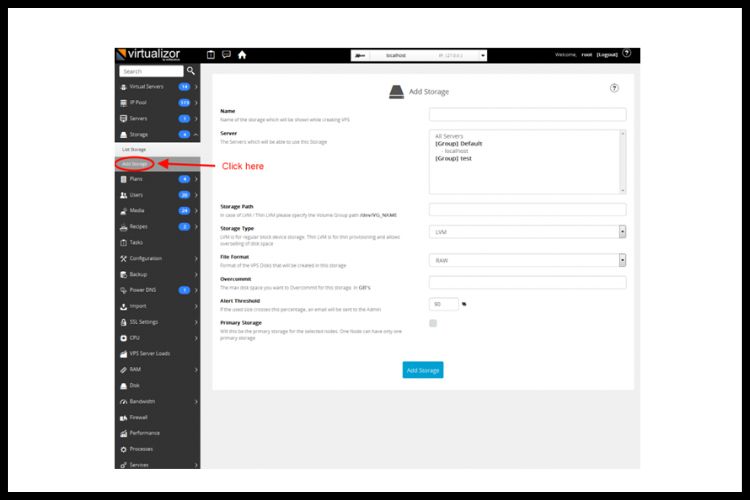
Create Storage

Before creating any VMs, it’s necessary to define your storage.

Navigate to Virtualizor Admin Panel -> Storage -> Add Storage.
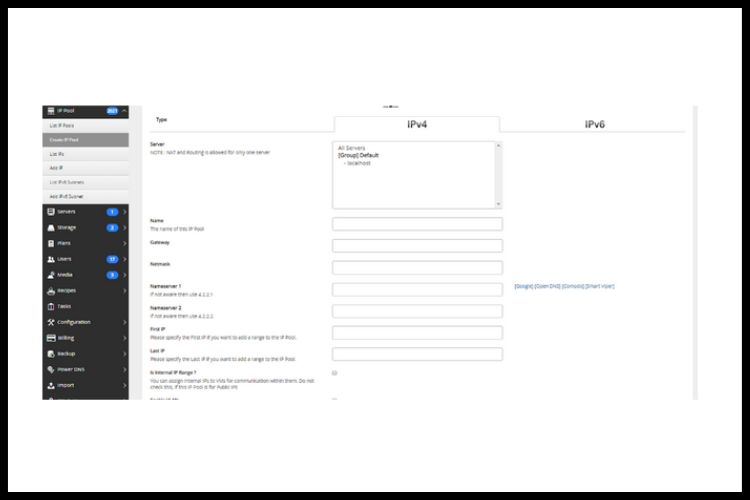
Create Storage

Create IP pool

Before creating any VMs, it’s necessary to define your IP Pool.

Navigate to Virtualizor Admin Panel -> IP pool -> Create IP pool.

Create IP pool

Step for create new VPS

Prerequisite:

Check the SPACE, Memory, Load (should be less than 9) of the server where you need to create new VPS.

Steps are given below:

Step 1:

Login into the virtualizer.

Step 2:

Create or select a user account.

Step 3:

Select Operating system.

Step 4:

Give the hostname of the server. ( eg:- server.ABC.com).

Step 5:

Set the VPS root password. (optional).

Step 6:

Assign the free IP address.

Step 7:

Enter server specification amount (As per customer plan).

Step 8:

Tick the option VNC (Must).

Step 9:

Under network setting.

Step 10:

Under the advanced option.

Step 11:

Select add a virtual server.

Coclusion

Still confused about how to create VPS on KVM Virtualizor? Contact Ideastack now!

Frequently Asked Questions

Q1. What is KVM Virtualizor?

KVM (Kernel-based Virtual Machine) is a complete virtualization solution for Linux running on x86 hardware that includes virtualization extensions (Intel VT or AMD-V). It is made up of a loadable kernel module called KVM.

Q2. What are KVMS used for?

KVM, which stands for “keyboard, video, mouse,” enables you to manage several computers using just one keyboard, mouse, and monitor. These switches are frequently used to handle racked servers, which contain multiple servers in a single rack.

Q3. Are KVMs worth it?

If you have multiple systems running, a software KVM switch is an efficient method to increase productivity. Using a single keyboard and mouse to handle several computers will save you time and money.

How to install KVM Virtualizor

1. CentOS 5.x / 6.x / 7.x or Red Hat Enterprise Linux 5.x / 6.x or Scientific Linux 5.x / 6.x or Ubuntu 12.04 or Ubuntu 14.04 or Ubuntu 16.04(x86_64).

2. yum / apt-get.

3. Storage to create the VPS disks.

Step 1: Take putty of the hardware server.

Step 2: Download and Install virtualizor.

1. wget – http://files.virtualizor.com/install.sh

3. ./install.sh [email protected] kernel=kvm //put any email address

Step 3: Reboot the server (# init 6).

Step 4: Once rebooted. Restart the virtualizor service on the server.

# /etc/init.d/virtnetwork restart ——> in centos 6
# service libvirtd restart            ——> in centos 7

Step 5: Check and put the network interface for the server.

1. Open Virtualizor in the browser.

2. Go to Configuration -> Master setting -> network interface -> network_interface_name.

3. Save the configuration.

Step 6: Done.

Step 7: Check firewall service and enable the virtualizor port.

Conclusion

Still confused about how to install KVM Virtualizor. Contact Ideastack now.

Frequently Asked Questions

Q1. What is KVM Virtualizor?

KVM (Kernel-based Virtual Machine) is a complete virtualization solution for Linux running on x86 hardware that includes virtualization extensions. It comprises of a loadable kernel module called KVM.

Q2. How do I add a server to Virtualizor?

Go to the Virtualizor Admin Panel on the Master, then select Servers >> Add Server. On that page, click “Add Server” after filling out the “Server Name, IP Address, And Server Password (Key Pass)” fields. The master will talk to the server and gather the relevant information.

Step for MySQL master to master replication

First, install MariaDB on both the CentOS 7 based servers.

Command:

#sudo yum install mariadb-server
#sudo systemctl start mariadb
#sudo systemctl enable mariadb
#sudo systemctl status mariadb
#sudo mysql_secure_installation (press enter for the root password for the first time when it asks and then provide your own password to MySQL)

Machines to explain the procedure.

Master1 IP: 192.168.1.25
Master2 IP: 192.168.1.26

Configuration Procedure:

Master1

In the master1 terminal, check the status of MariaDB.

#sudo systemctl status mariadb

Open my.cnf file and add the following statement to the file. Save and exit from the file.

#vi /etc/my.cnf
server-id=10
log-bin=mysql-bin

Restart the MariaDB service by running the following command.

#sudo systemctl restart mariadb

After login to MySQL we are going to create a user.

#mysql –u root –p
#MariaDB [Linux]> create user ‘reply’@’%’ identified by ‘12345’;(here reply is a user and 12345 is password)
#MariaDB [Linux]> grant replication slave on *.* to ‘reply’@’%’ identified by ‘12345’;
#MariaDB [Linux]> flush privileges;
#MariaDB [Linux]> flush tables with read lock;
#MariaDB [Linux]> show master status; (it will show you the master log file and master position)
#MariaDB [Linux]>exit

Take the MySQL dump from master1 terminal and execute the following command.

#mysqldump mysql –u root -p> mysql-db.sql
#rsync -Pavzxl mysql-db.sql [email protected]:/root/

Master2

In the master 2 terminal, check the status of MariaDB.

#sudo systemctl status mariadb

Open my.cnf file and add the following statement to the file. Save and exit from the file.

#vi /etc/my.cnf
server-id=20
log-bin=mysql-bin

Restart the MariaDB service by running the following command.

#systemctl restart mariadb.service

Now inject the MySQL dump file into the master2 database.

#mysql mysql -u root -p < mysql-db.sql

After dumping, open the MySQL shell and do the replication configuration as shown below.

#mysql –u root –p
#MariaDB [Linux]> stop slave;
#MariaDB [Linux]> change master to master_host=’192.168.1.25′, master_user=’reply’, master_password=’12345′, master_log_file=’mysql-bin.000002′, master_log_pos=566; (check the master log file and master log position of master1)
#MariaDB [Linux]> start slave;
#MariaDB [Linux]> show process list;

Check the slave status by using the command as shown below.

#MariaDB [Linux]> show slave status;
#MariaDB [Linux]> exit

Restart the MariaDB service by running the following command.

#systemctl restart mariadb.service

Go to the master and check the master status using the command as shown below.

# mysql –u root –p
#MariaDB [Linux]> show master status; (it will show you the master log file and master position)

Master1

In the master terminal, check the established connection using the netstat command.

# netstat -natp | egrep -i established.*mysql

Open MySQL and check the process list and also configure the replication settings.

#mysql –u root –p
#MariaDB [Linux]> unlock tables;
#MariaDB [Linux]> show processlist;
#MariaDB [Linux]> stop slave;
#MariaDB [Linux]> change master to master_host=’192.168.1.26′,
master_user=’reply’,master_password=’12345′, master_log_file=’mysql-bin.000004′, master_log_pos=245;
#MariaDB [Linux]> start slave;
#MariaDB [Linux]> show slave status;

Replication configuration is done. Now checking the Replication process.

Master1

I have created one database named Linux.

#MariaDB [(none)]> create database Linux;
#MariaDB [(none)]> use Linux;

Create a table for the newly created database.

# MariaDB [Linux]> create table Distribution (Distro varchar(25) NOT NULL);

Insert some values into the newly created table.

# MariaDB [Linux]> insert into Distribution values(‘REDHAT’);

The table and the database has been created successfully. List the table from the database.

# MariaDB [Linux]> select * from Distribution;

Master2

In master 2, login to MySQL and list the databases.

# MariaDB [(none)]> show databases;

Now the database which is created in master1 is replicated in master2. Use the database and list the table.

# MariaDB [(none)]> use Linux ;
# MariaDB [Linux]> show tables;

Select and list the table from the selected database.

# MariaDB [Linux]> select * from Distribution;

Insert some values into that table and list the table’s values the updated values are shown. Now the replication between master-master is working successfully.

# MariaDB [Linux]> insert into Distribution values (‘Ubuntu’);
# MariaDB [Linux]> select * from Distribution;

Master1

Again go to the master1 terminal, now select and list the tables to check the replication process. If the updated value from master 2 is shown, then the replication process is done.

#mysql –u root –p
# MariaDB [Linux]> select * from Distribution;

Conclusion

Still confused how to step for MySQL master to master replication. Contact Ideastack now.

Frequently Asked Questions

Q1. How does master master replication work in MySQL?

Replication relies on three threads per master/slave connection: one on the master and two on the slaves. The slave server begins this thread when you issue START SLAVE, and it connects to the master and requests a copy of the master’s binary log.

Q2. What are the three replication strategies?

Q3. What are the two types of replications?

There are two types of replication exist: direct and conceptual.

Benefits of employing Windows VPS services at reasonable rates

VPS Server

VPS servers have gained popularity because of the advantages it is posing for web hosting needs. VPS refers to the virtual private server which acts like a physical server in a virtual way giving the same features as the physical server would. It works with a definite number of resources allowing you to scale up your resources as per your requirements. So with VPS hosting, you can seek the advantages of a physical server in a much cheaper way.

VPS

VPS Hosting

In VPS hosting, Windows VPS is considered to be the most effective because of the added features and performance it offers. Windows VPS runs on the OS of Microsoft developed windows OS which ultimately justifies its quality. It possesses some important advantages as follows:-

It possesses some important advantages as follows:-

1.

Microsoft has focused on developing Windows VPS in a newly upgraded, user-friendly way which can give better solutions and compact performance on a cheaper investment.

2.

Affordable Windows VPS can also be a beneficial tool for those who need ASP or net technology.

3.

Microsoft has been in this market for a very long time and now they have a perfect idea of what their customers want. They develop their systems accordingly and make sure to give proper assistance to their buyers regarding their usage. This makes it easy for the buyers of Windows VPS to use it with better knowledge and enhance its productivity.

4.

Windows VPS at cheaper rates could benefit you with extra features like faster updates, better support services, reliable performance rates, etc at just minimal costs.

5.

Windows VPS uses only the Windows software and Windows functions which makes your VPS have better quality and assured performance fulfilling all your web hosting needs.

6.

Windows VPS is also supportive of the security measure and other security tools posing no risk to your database and ensuring minimal data breaching chances.

Windows VPS

Conclusion

Therefore getting Windows VPS at affordable rates can be a big boon to your web hosting needs. As you get the assistance of Microsoft features which give you an interface being easy to use having settings and icons which are familiar and simple to understand.

Windows VPS also offers you a flexible option to scale up your operations easily. It also comes with some in-built features which are specially developed to benefit business transactions. It offers a wide array of functions that allows you to carry out in-depth customization effectively.

You should never leave a chance of getting Windows VPS at cheaper rates. Ideastack is one of those brands offering effective services of Windows VPS at cheaper rates.

Frequently Asked Questions

Q1. What is VPS and why is it necessary?

Hosting that resembles dedicated server environments on a shared server is known as VPS hosting. VPS hosting has gained popularity since it is often less expensive than dedicated hosting while providing more speed, security, and dependability than shared hosting.

Q2. What is the benefit of a VPS server?

VPS, or virtual private network hosting, enables businesses to progress from basic hosting to resources that allow them to install entire websites and eCommerce models without incurring the high costs of a dedicated server or dedicated hosting agreement.

Q3. Why use Windows VPS?

VPS, or virtual private network hosting, enables businesses to progress from basic hosting to resources that allow them to install entire websites and eCommerce models without incurring the high costs of a dedicated server or dedicated hosting agreement.

Unblocked particular IP from WHM/cPanel

Log in to the main WHM Panel

Step 1: Search for Plugin section.

Step 2: Go to ConfigServer Security and Firewall.

Step 2

Step 3: Search for the IP which you want to get unblocked from WHM Panel.

Step 3

Step 4: If given IP will be blocked then you’ll find that IP here after clicking on Search for IP button.

To unblock that IP you’ll get the Unblock button below, just simply click on that button and that IP will be unblocked.

Now user can open the panel from that IP.

The reason why IP got blocked: User might attempt a multiple failed login attempt.

Conclusion

Still confused how to unblocked particular IP from WHM/Cpanel. Contact Ideastack now.

Frequently Asked Questions

Q1. What is WHM cPanel?

A web application called WebHost Manager (WHM) from cPanel gives you administrative control over your dedicated server or Virtual Private Server (VPS). To create individual accounts, add domains, manage hosting services, and carry out simple maintenance, you utilise WHM with cPanel.

Q2. What does WHM mean hosting?

WHM (WebHost Manager) gives you administrative access to your dedicated server or virtual private server. It enables a hosting company to control a client’s account. WHM can also be used as a reseller control panel.